Tasks & board

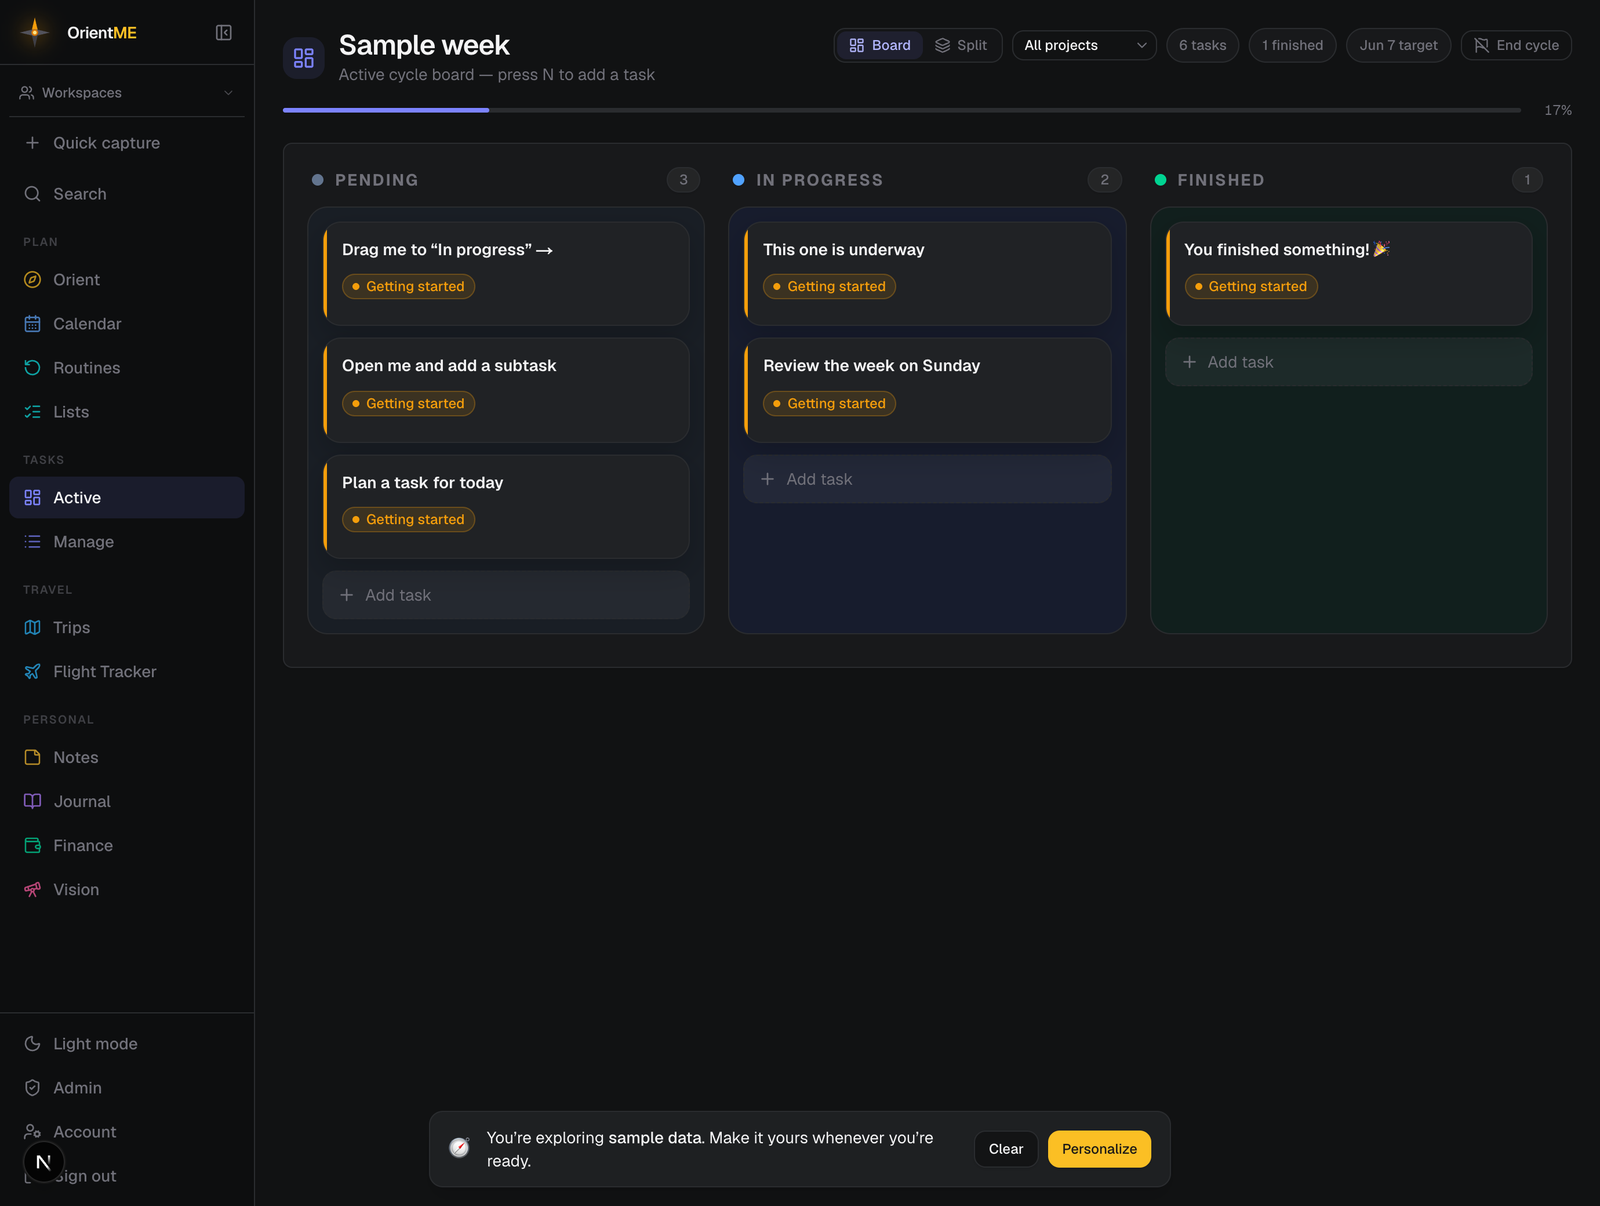
The board is where your active work lives. It shows the tasks in your current cycle, organized into three columns so you always know what’s next.
| Column | Meaning |
|---|---|
| Pending | Not started yet |
| In Progress | Actively being worked on |
| Finished | Done |
You’ll find the board under Tasks → Active in the sidebar. The header shows the active cycle’s name, quick stats (task count, finished count, target date), and a progress bar.
OrientME calls planning periods cycles. Tasks not assigned to any cycle live in the queue. See Cycles for how the two fit together.
No active cycle yet?
If you haven't started a cycle, the board shows a Start your first cycle card instead of columns. Click it to name your cycle and pick its dates — then your tasks have a home to move across Pending → In progress → Finished.
Create a task
Click Add task at the bottom of any column, type a summary, and press Enter. Only a summary is required — everything else is optional and can be added later.
With a cycle active, press N anywhere (when you’re not typing) to start a new task in Pending.
Move and reorder tasks
Drag a card between columns or up and down within a column to reorder it. After a move you’ll see a Tasks moved message with an Undo button. You can also change a task’s status from inside its detail view.
Hovering a card reveals two quick actions in its corner:
- The check marks the task finished in one click — no dragging — with a Task completed message and an Undo that puts it back where it was.
- The Move to queue icon takes the task off the board without deleting it — it returns to the queue for later.
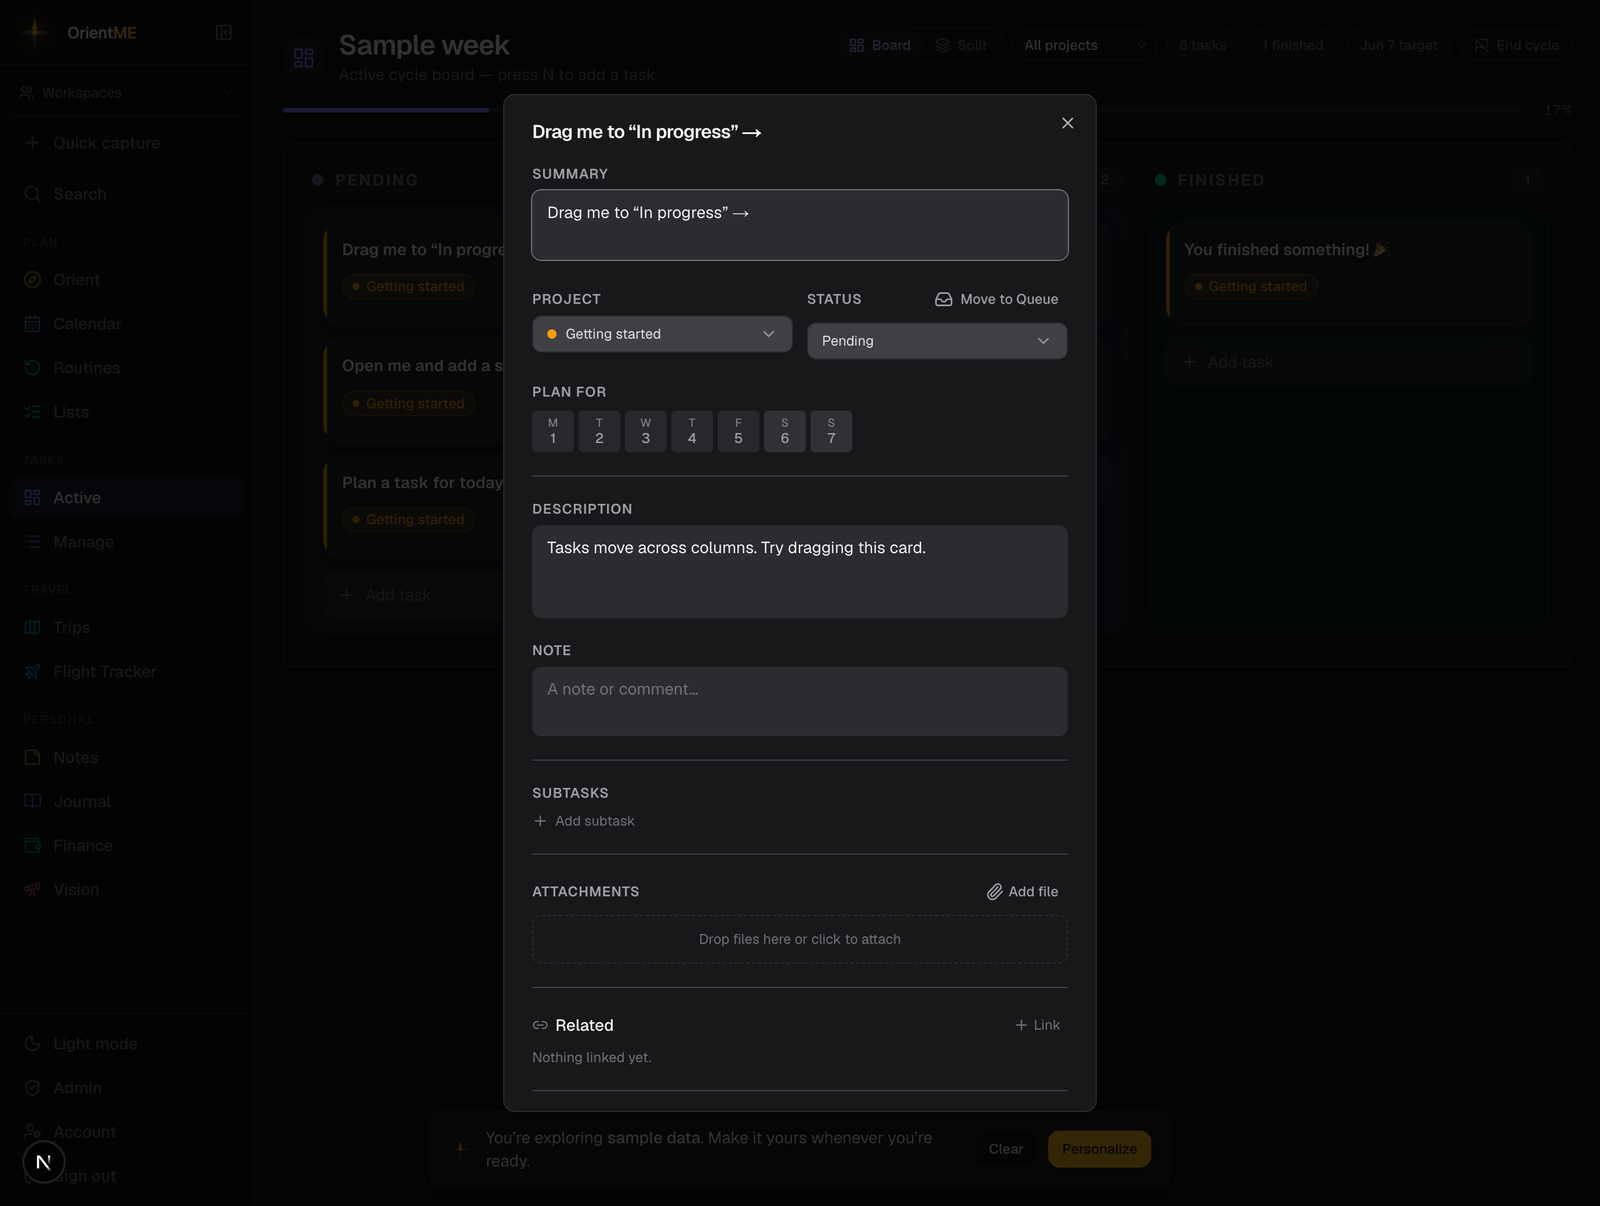
Task details
Click any card to open its detail view. Everything here saves automatically as you edit — there’s no save button, just a small “Saving… / Saved” indicator.
- Summary — the task’s title
- Project — group the task under a project (or “No project”)
- Status — for a task on the board, switch between Pending, In Progress, and Finished. A Move to Queue button next to it lifts the task off the board for later. A queued task shows Queue here instead, with an Assign to cycle button to drop it into the active or a planned cycle.
- Plan for — pick a day (or a range) on the cycle’s calendar; the time defaults to 9:00 AM and you can change or clear it
- Description — formatted details; links become clickable
- Note — a short comment
- Subtasks — an ordered checklist (see below)
- Attachments — files connected to the task
- Related — link this task to notes, trips, journal entries, and more (see Related items)
To delete a task, scroll to the bottom and click Delete task (it asks you to confirm, since this also removes its subtasks and attachments). A Task deleted message lets you Undo.
Subtasks
Open a task and click Add subtask to add checklist items. Each subtask has a checkbox and a drag handle for reordering; completed items drop to the bottom. Cards on the board show a running count like 2/5, which turns green when everything is checked.
Attachments
Attach documents, images, and more by dragging files onto the task, pasting a copied screenshot, or clicking Add file (you can pick several at once). Each file shows its name and size with options to download or remove.
Projects
A project groups related tasks across cycles. Manage projects under Tasks → Manage → Projects: give each a name and color, then assign tasks to it. On the board, a colored strip and badge show a task’s project, and a project filter appears in the header when the cycle has tasks in more than one project.
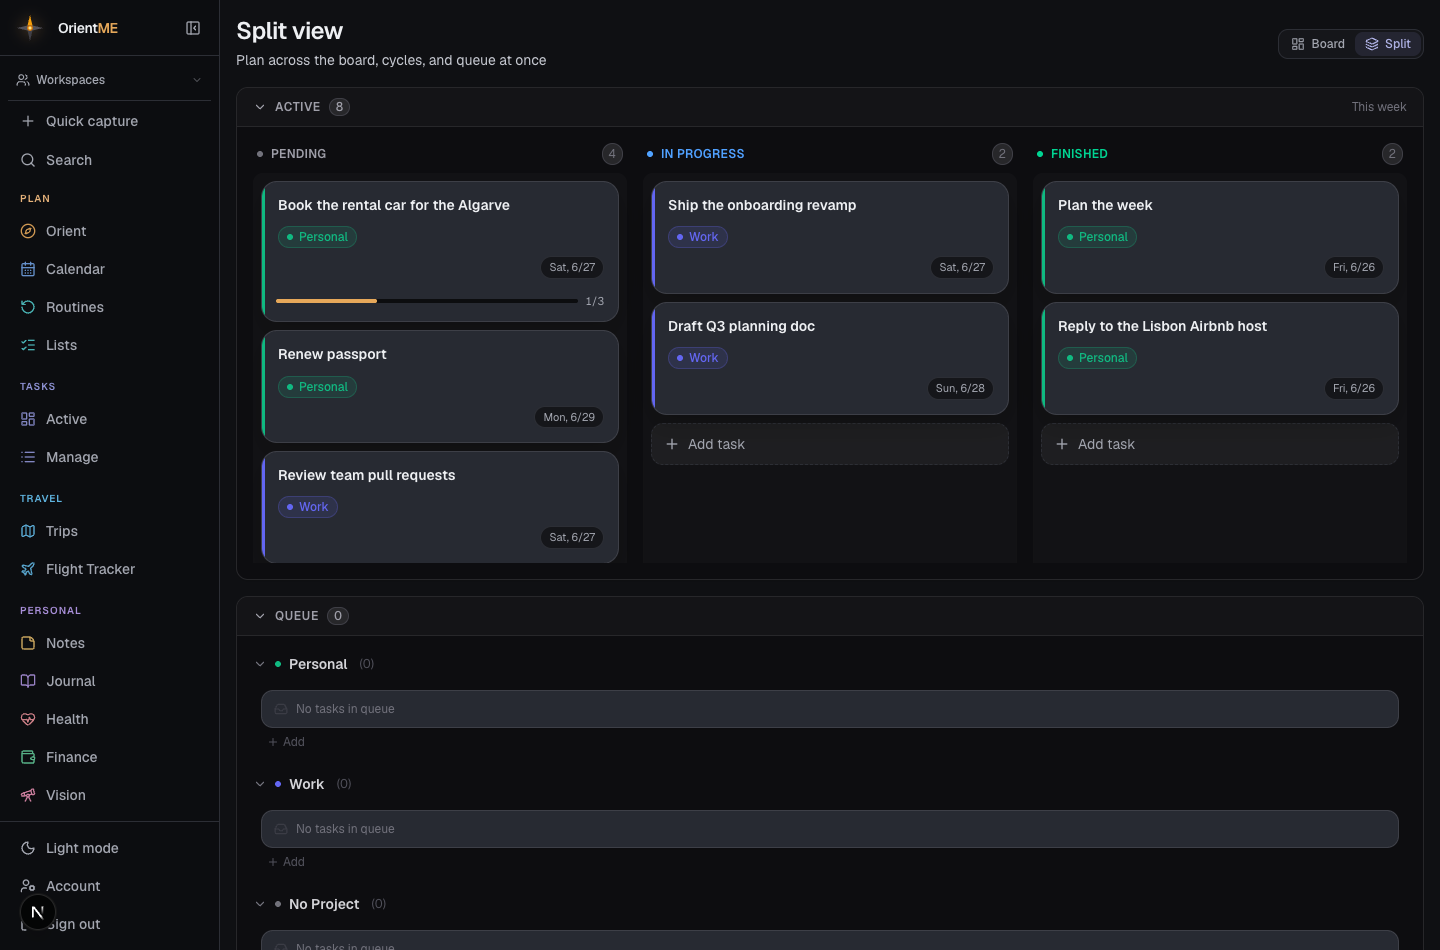
Board and split views
A Board / Split toggle sits in the header. Split view stacks the active board, your planned cycles, and the queue on one screen, so you can drag a task straight from the queue onto the board — handy when planning a cycle. Switch back with the same toggle.
Scheduled — everything with a date
Tasks → Scheduled in the sidebar is your agenda of dated tasks — everything with a date, whether or not it belongs to a cycle. Tasks are grouped by day: an Overdue band at the top, then Today, Tomorrow, and each date ahead.
The point of this view is that nothing here needs a cycle or a project. Give a task a date and it shows up — no sprint planning, no board. It's the light home for quick, dated things: a follow-up, a reminder, a “deal with this by Friday.”
- Add — the Add button (or the + on any day) creates a task on that day and opens it so you can type. No other decisions required.
- Complete — tap the circle on the left to mark a task done.
- Open — tap a task to open its full details.
- Cycle tag — tasks that are part of a cycle show a small cycle label, so you can see your committed work alongside your loose dated work. Turn on Hide cycle tasks to see only the items that aren’t in any cycle.
- Overdue → Today — overdue tasks show how many days late they are and a one-tap Today button to pull them to today.
Your Today page is the “today” slice of this same agenda — Scheduled just shows the whole run of upcoming days as well. On mobile, Scheduled is a tab across the top of the Tasks screen.
The queue
Tasks with no cycle sit in the queue (under Tasks → Manage → Queue), grouped by project. Use it as a capture bucket for everything you might do later; during planning, pull only the work you realistically want into the current cycle. See Cycles to learn how queued work becomes scheduled work.
Select several tasks at once
Planning goes faster in bulk: hover a queued task and tick the checkbox that appears on its left (hold Shift and click another to select the whole range between them). A floating bar appears with the count and three actions:
- Assign to cycle — pick an active or planned cycle; every selected task moves there. The confirmation toast has an Undo if you change your mind.
- Set project — move the selection into a project (or No Project), also with Undo. The selection stays active, so you can group tasks and then assign them in one more click.
- Delete — removes the selected tasks after a confirmation.
Press Esc, or the × on the bar, to clear the selection.